Short answer: to turn a CSV into a regular table on a Confluence page, use a table import workflow. Confluence databases have their own built-in CSV importer, and a space-level CSV is a migration archive. Choose the workflow that matches the kind of content you are moving.
Prepare a small CSV
A CSV stores rows and columns as text. Start with a short file where each line is one row and each field uses the same delimiter. This example uses commas and a first row of labels:
Task,Owner,Status
Draft monthly report,Ada,In progress
Review open requests,Marco,Not started
Publish release notes,Sam,Done
Download the example CSV if you want to try the same rows. The file is a simple example; check the imported first row and adjust its header styling in Confluence if needed.
If the import dialog asks for a delimiter, select the one used in your file. The current Marketplace listing documents an explicit delimiter choice and a way to retry after a failed import. The product listing does not specify supported character encodings; when your data includes accented or non-Latin text, save as UTF-8 if your spreadsheet offers that option and test a small file first.
For the first attempt, keep values simple and avoid embedded line breaks. If a value contains the delimiter, use standard CSV quoting and verify the result before importing a larger file.
Import into a regular page table
Use this route when you want rows and columns on an ordinary Confluence page, rather than in a Confluence database.
- Open the Confluence page where you want the table and make sure you can edit it. The Table Import Export app must be available on your Confluence site.
- Open the page's Content actions and choose Table Import Export.
- In the app dialog, select Import, choose your CSV file, and set the delimiter to match the file if the control is shown.
- Select Import. When it finishes, inspect the table's columns, row count, first row, and any non-English characters before relying on the data.
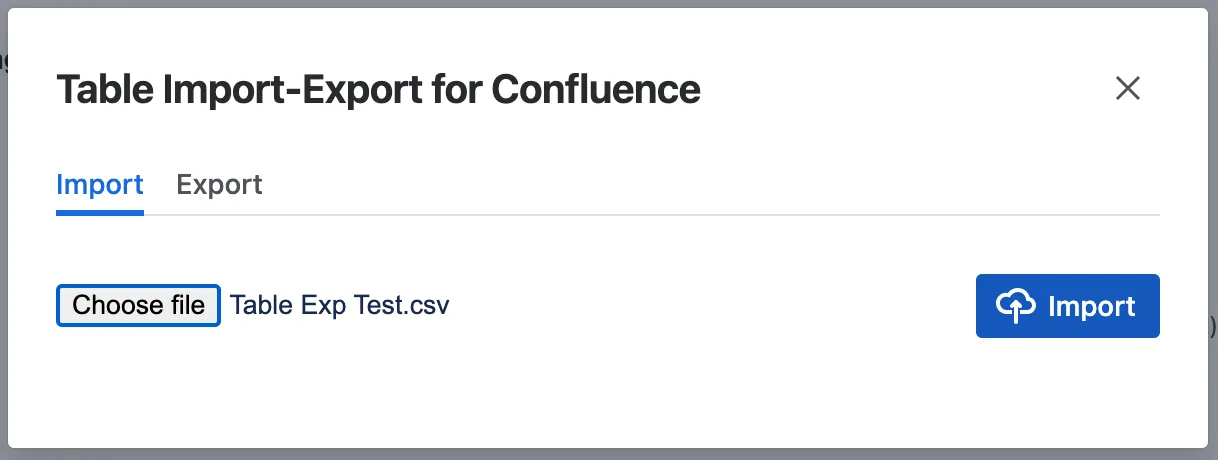
The expected result is a Confluence page table whose rows and columns reflect the CSV. This upload imports the file's current values; later changes to the source file are not part of that import. Review the result as a separate copy. See the current Marketplace listing for Table Import Export for supported formats and release information.
For a recurring workflow, review the Table Import Export app overview. It is currently listed as a free app for Confluence Cloud; use the Marketplace link there to check current compatibility and installation details. To move data out of a page table, read how to export a Confluence table.
Import into a Confluence database
A Confluence database is a structured content type with fields and entries. It is different from a table inserted into a page. To import CSV data into a database:
- Open the database's More (•••) menu and select Templates and import.
- Under Import, upload the CSV. Confluence uses the first CSV row as field names.
- If the database already has data, choose whether to create fields, add data to existing fields, or replace the database. Read the confirmation carefully: replacing removes existing fields and values.
- Review the imported field types and values; Confluence may infer types, and dates need particular care.
Check date fields before relying on them: Atlassian says database imports do not automatically detect date fields and interpret dates month first. For example, 12/06/2025 means December 6, 2025 in this workflow.
Follow Atlassian's current instructions for importing data into a Confluence database. In this workflow, the CSV creates or updates database entries; it does not create an ordinary page table.
Import a space migration archive
Confluence's space-level CSV option is for exporting space content to move it between Confluence Cloud sites. It creates an archive, not a spreadsheet containing one page table. A space administrator exports it from Space settings → General → Export space; a site administrator imports the archive through Confluence administration. Atlassian notes that databases do not retain their content or functionality through this space migration workflow.
Use Atlassian's guides for exporting a space and importing a Confluence Cloud space when your goal is a migration.
Troubleshoot common CSV issues
- Everything appears in one column: retry with the delimiter that matches the file. A semicolon-delimited file will not split into columns when read as comma-delimited.
- Columns shift or values split unexpectedly: check for inconsistent rows or delimiter characters inside values. Quote fields that contain delimiters and test a few rows first.
- Accented characters look wrong: export or save a small test file as UTF-8, then import it again. The app's published listing does not state a full encoding matrix.
- The import reports a failure: correct the source CSV and retry. If it still fails, contact app support with a small sanitized example rather than customer data.
- You expected a page table but got database fields or an archive: check whether you used the database importer or the space migration export. They are separate Confluence workflows.